In Mass Effect: Andromeda, it’s possible that the Ryder may be visiting a planet named as Voeld deep within the Nol System. If Ryder visits Voeld, he/she will be visiting to meet the elders of Angaran Resistance in order to find a way to fight off and defeat Kett. There are a number of other side quests in the game as well in which Ryder will be visiting the planet Voeld. As Voeld is not a habitable planet, Ryder will have to find and activate three ancient remnant monoliths to find the Vault.
The Vault controls the planet’s climate and it’ll be the source to make the planet habitable. So if you are playing as Ryder and you have to visit Voeld, you might be going on to complete a Side quest named as “Restoring the World”. The following guide will help you complete it.
First of all, if you want to restore the planet Voeld, you’ll have to solve three Voeld Monolith puzzles. You’ll find these puzzles located in North, South, and West if you want to enter in the Remnant Vault. On the map, you can find the Monolith locations with marked letters such as “W” (West), “N” (North), and “S” (South).

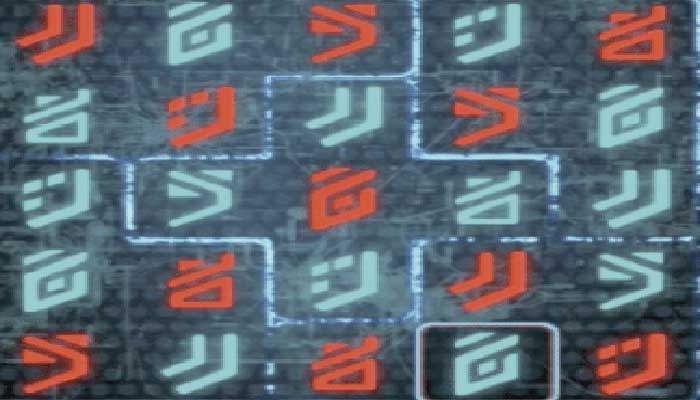
You’ll have to start from the South Remnant Monolith (S), and your primary objective here is to find a Synaptic Glyph, Zero Glyph, and Semiosis Glyph. In order to clear up the areas surrounding the monolith, you’ll have to clear up the wildlife. Once done with that, look for a “Black Remnant Block”. You’ll find it in the spires of ice and snow boulders behind the monolith. On the block, you’ll both the Semiosis and Synaptic glyphs. Now look for the Zero Glyph on the floor block. Find it in the tunnel entrance behind the monolith. It’ll be in a large crevice on the west side of the tower. Once you have all the Glyphs, arrange them in the following order on the Remnant Console.
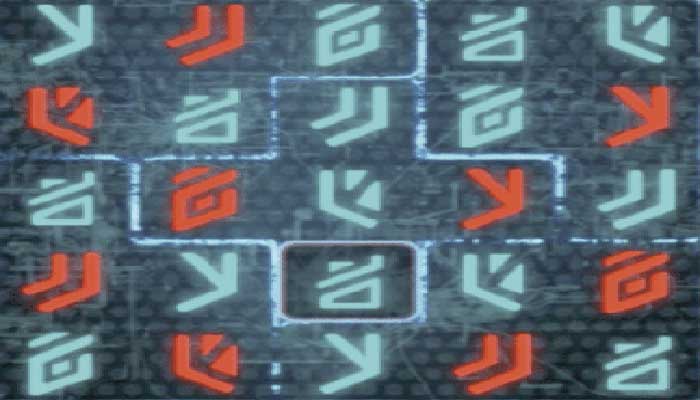
After dealing with the South Remnant Monolith, head towards the North Remnant Monolith (N). This is another entrance to the monolith that is slightly different from the south. It’s not a tunnel but a very narrow valley located on the north side of the monolith. Here another Puzzle awaits you at the Remnant Console. In order to solve this puzzle, look for two glyphs on the oncoming arch type pillars above. So, to find the Magnitude Glyph, jump on the left side pillar and walk/run to the other end.
There you’ll find your Magnitude glyph. Now for the second glyph, jump onto the right side pillar, and run to the other end. There you’ll find the Adherence Glyph. Now scan this pillar and find the conduit. The conduit will lead you to the third and final glyph named as the Entropy Glyph. Once you’ve got all the glyphs, enter the glyphs on the Remnant Console in the following order.
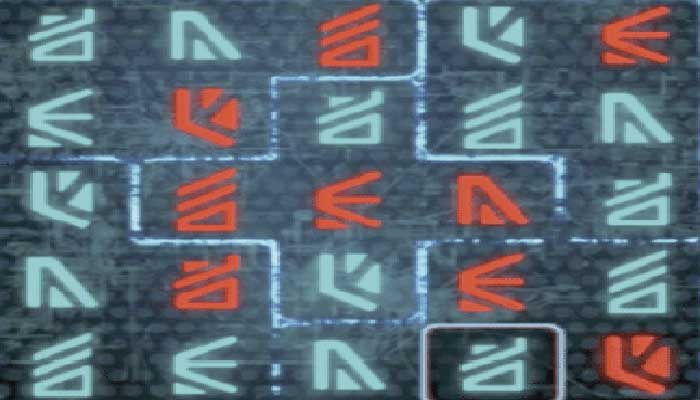
Finally, it’s time to reach the West Remnant Monolith (W). This particular side of the monolith features a deep ravine on the north face and it leads directly to the North Monolith Tunnel. This area is a little bit difficult to explore because of the excessive wildlife. So, you’ll have to clear all the wildlife in the surroundings. You can also totally ignore the wildlife and hop into your Nomad to cross the tunnel as soon as possible. It’s also possible that the hostile creatures will follow you. In that case, get out of the Nomad and face them. Once all through with the wildlife and hostiles, you’ll have to look for the two glyphs that are needed to solve the puzzles at the Remnant Console.
The two glyphs that are needed are the Magnitude Glyph and the Verdurous Glyph. Now reach down to the pillars and look for the Magnitude Glyph on the floor block by the cave wall. You’ll find the Verdorous Glyph on top of the pillar. Once you have all the required glyphs in hand, reach down to the Remnant Console and insert the glyph in the following order on the Remnant console.
Once you have solved all the puzzles and found all the monoliths, you’ll immediately have the location of the Remnant Vault. You’ll find the vault in the central location of the three monoliths. Now you’ll have to enter the vault using the Gravity Well and descend to the lower level.
Once there, head towards the Gravity Well chamber and scan for the Adaptive Remnant Core Device and the Remnant Shield Charger. Head to the Power Changer by following its path and activate the emergency power. Once the emergency power is online, look for the Remnant console on the ledge against the wall. This console will open up a door that leads to the second Remnant console. On the second console, you’ll find a blue laser that points towards the ledges on the left. The white laser will be pointing towards the ledges on the right. You’ll have to follow the path on your right side. This path will lead you to the console that activates the Vault. The path on your left is optional but you can follow it to find some goodies. So, do explore this path as well.
Keep in mind that you’ll have to defeat all the Remnant Assemblers soon after raising the pillars. After that swiftly use your jump-jet to reach the top platform. This platform will lead you to the side passage. This path will be blocked with two assemblers and a destroyer. Defeat the assemblers first and then aim for the destroyer and defeat it afterward.
Now after defeating the assemblers and destroyer in the passageway, head for the console on the left wall. Complete the glyph puzzle in the following order. This puzzle is restricted to only one chance. So, you’ll have to solve it in only one turn.
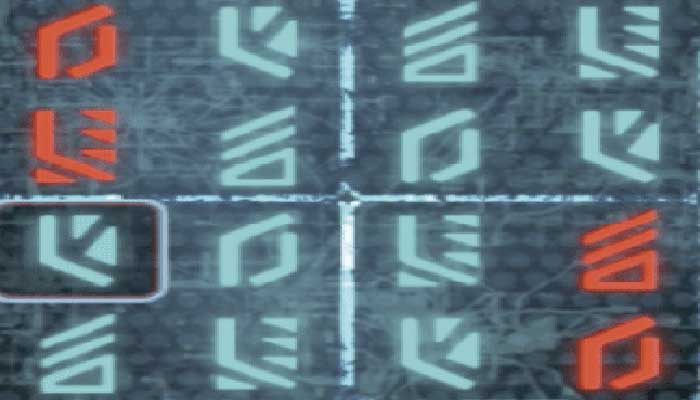
Once done with all that, exit the tunnel and walk up to the top of the platform. Follow the bridge on the left side of the vault, look for the console on the left wall. Interact with this console to open up the first level of security in the container room. You’ll have all the doors opened now and the force field will be visible. The force field will immediately shut down as soon as the vault lockdown is lifted. Now, head for the pillars and reach the platform where you’ll face some Assemblers and Nullifiers. Take care of all of them, reach the console and activate the Purification Field.
Once the Purification Field is activated, Exit the vault by using the Gravity Well. Once outside, you’ll find the temperature increase by 13 degrees and Voeld’s viability will also be increased by 40 percent.
For a more detailed tutorial, have a look at the following video by Paranoia’s Dungeon on “Restoring A World.”
Hopefully, this guide to the Side quest “Restoring A World” will be helpful to you. If you find it helping and you have completed this side quest, do share your experience with us. It’ll be a great way to learn more about Mass Effect: Andromeda.
