Ringtones for iPhone? Bored of hearing the same old ringtone again and again? Let’s try something exciting! This post will cover everything that you need to know about how to make ringtones for iPhone. How many times have you listened to your favorite song and wished that you could make it your ringtone? There’s something magical about making your favorite song your ringtone – fond memories you associate with the song, the euphoria and the joy of listening to the song that makes you think of someone or something special!

How to Make Ringtones for iPhone
One of the best ways to make ringtones for iPhone is to set your favorite song in iTunes as your ringtone. Why wait? Let’s get started.
First, decide on the song you wish to make as your ringtone. We also suggest that you listen to the song and determine the segment of the song you wish to set as your ringtone. Once you know the song and segment, follow these steps (best done on desktop) –
1. Open iTunes.
2. Select the song you wish to set as the ringtone from iTunes library.

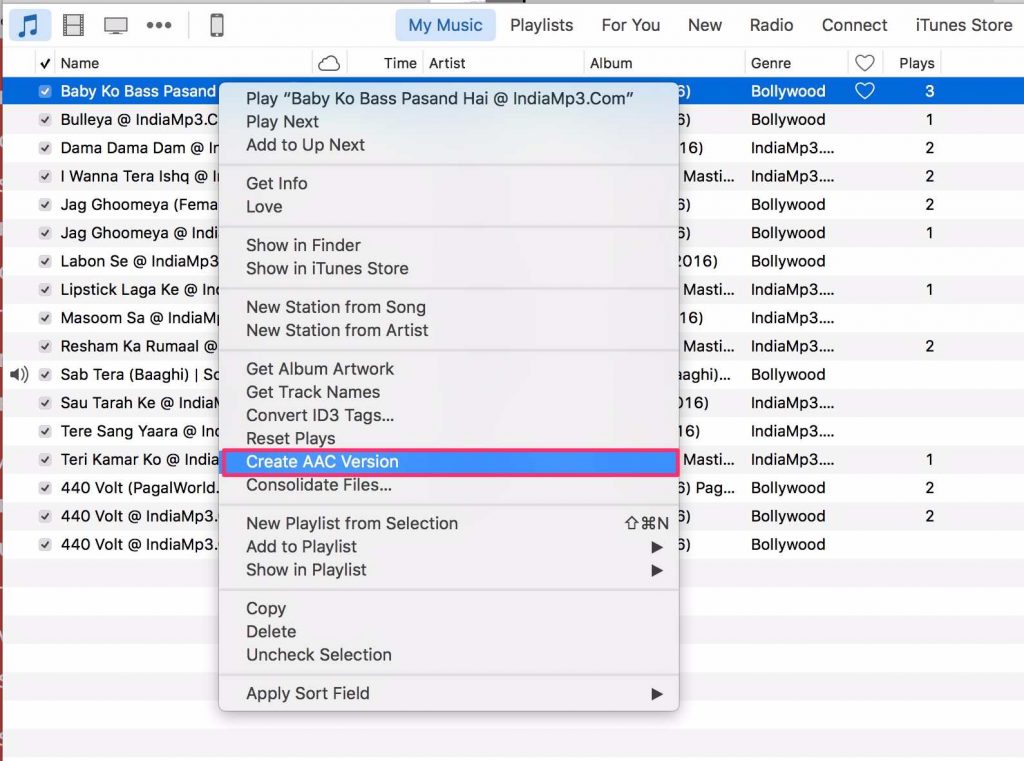
3. Select Get Info (above image) by right clicking on the song. Open the options tab

4. Here you’ll see options to change the Start and Stop time. Basically, set the Start and Stop time such that it covers the segment of the song you wish to have as the ringtone. For example, if your favorite song is 5 minutes 32 seconds, you can set 2:30 as the Start time and 3:00 as the Stop time. This makes the segment of the song between 2:30 and 3:00 as your ringtone.
5. Note that the segment of the song you select cannot exceed 30 seconds.
6. Create the AAC version of the song by right-clicking on the song.

7. This creates a new song file with the same name, but with the length you selected.
8. Head to this newly created song file. Select Show in Folder. You’ll see that this file has the extension “.m4a“
9. Tap on it and rename only the extension (and not the entire file name) from “.m4a” to “.m4r“. You’ll see a notification that asks you to confirm. Select Use .m4r

10. Now, head back to iTunes and delete the newly created song file. Select the file and press Delete. Confirm deletion.
11. Next, you’ll be asked if you wish to move the selected song to Trash or Keep it in iTunes. You must select “Keep File“.
12. Now, go back to .m4r file and double click on the file. This action should automatically move the ringtone to iTune’s tone library.
13. Connect to iTunes through your iPhone. Select the Tones tab.
14. Now, Sync All Tones and then tap Sync on the bottom on the iTunes screen.
15. Once the sync is complete, you can find the new ringtone in Settings app. Head to Settings -> Sounds -> Ringtone to select the new ringtone you just created.
And we’re done! Phew! Quite a lot of steps to follow! But the reward is worth the pain. You can now hear your favorite song every time your iPhone rings and experience the sheer joy your favorite music brings! Setting ringtones for iPhone should now become a task that you’re very familiar with. Bored of the same song? Just follow the same steps and choose another song as your ringtone! Enjoyed reading this article? We’d love to hear your experiences in the comments section. Wish to listen to your favorite song to choose the segment of the song for your ringtone but unable to connect to WiFi? Check out our post on how to fix WiFi issues on iPhone.
More on iPhone / iPad
