Fast user switching is a very useful and handy feature in Windows 10, but it also has some disadvantages. Many Windows 10 users have been asking how to disable fast user switching? We finally decided to come with a solution to this problem. In this guide, we will help you disable fast user switching in Windows 10 computers.
Windows 10 came up with loads of new features and a whole new interface. One of those many amazing features is the fast user switching. This feature can be handy at times, but like many things, this feature came up with some downsides. The Fast User Switching feature helps users to sign in, without logging out the other users. Meaning, two or more users can log onto the same computer, without signing out any of them. While this feature helps us by not logging out the other users, it also has some disadvantages.
Disadvantages of Fast User Switching
If you are using a computer with 4 GB or lesser RAM, then this could cause a serious problem for you. Why? Suppose, if a user has left some resource-intensive application running. Now, as the Windows hasn’t logged that user out, their applications are still running in the background. That means they are using the computer’s resources and which will slow it down. Not just that, you cannot shut down or restart your PC without the risk of losing the files they haven’t saved or had them sign out.
So, if you don’t want to use the fast user switching feature, we can help you disable it. And by disabling it, what we mean is that the all the switch user interfaces on Start Menu, task manager and sign in screen will be hidden. Once all the users have signed out of their accounts, the option to fast switch will be gone, and it practically means the feature is disabled.
How to Disable Fast User Switching
There are two ways to disable Fast User Switching in Windows 10. You can do it by either making a quick edit to the Registry or you can get rid of it from Local Group Policy Editor. Follow any of the methods mentioned-below.

1. Editing the Registry (Windows Home Users)
For Windows Home edition users, you can disable the fast user switching only this way. If you are a Pro or Enterprise users, you can also use this method. Follow the steps to disable fast user switching from the registry.
STEP 1. Go to Cortana from the taskbar. Type Regedit and press Enter. When asked for permission, click Yes. This will open the registry editor.

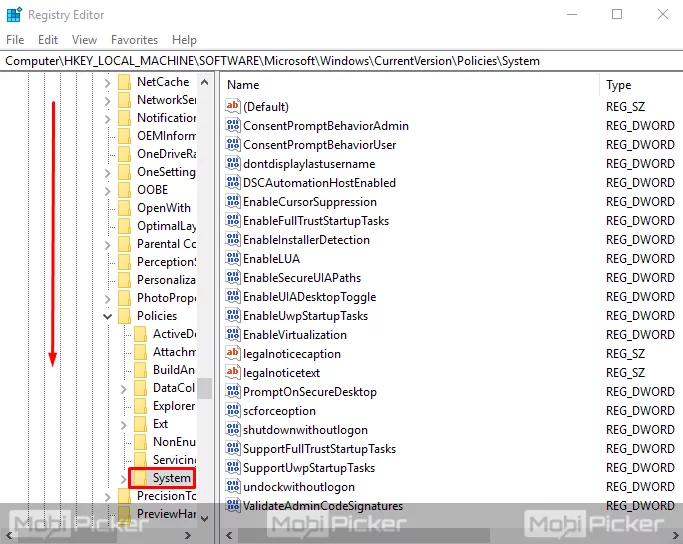
STEP 2. On the left sidebar, follow this path –
HKEY_LOCAL_MACHINE > SOFTWARE > Microsoft > Windows > CurrentVersion > Policies > System

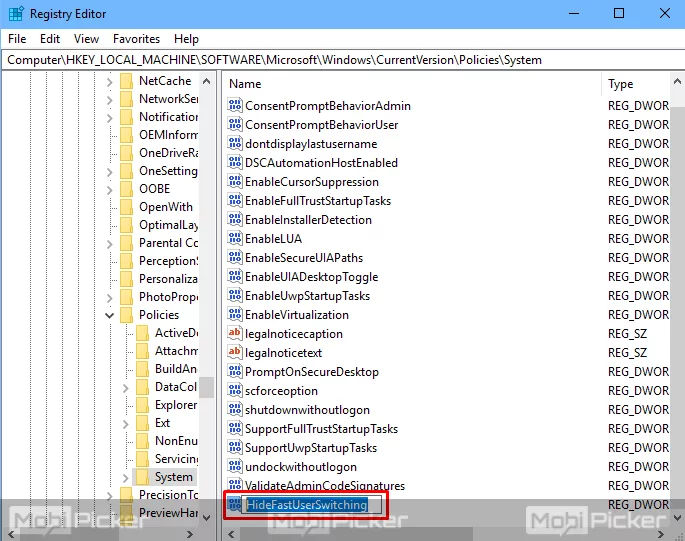
STEP 3. Now, you need to create a new value. On the right side, right-click on an empty space and follow this path –
New > DWORD (32-bit) Value

STEP 4. Name the file as “HideFastUserSwitching”

STEP 5. Now, double click on HideFastUserSwitching. This will open the Edit dialog box. Here, change the Value Data from 0 to 1. Click OK after you are done and close the Registry Editor.

And that’s it. Now you just need to sign out every other user, or you can simply restart your computer and sign in onto any account. Go to the Start menu and you won’t see the fast user switching options anymore.
2. Local Group Policy Editor (Windows Pro and Enterprise Users)
Windows Pro and Enterprise users can disable the fast user switching feature from editing the registry as well, but this method is easier for them. Follow the steps to disable fast user switching.
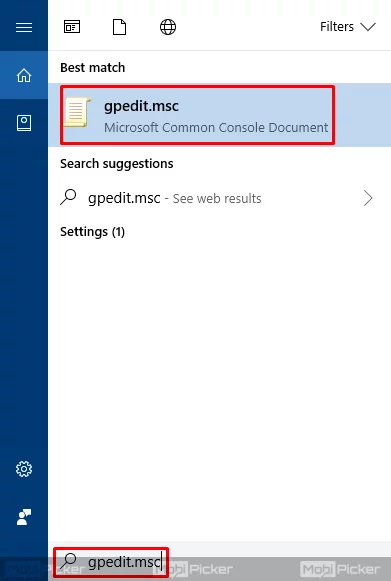
STEP 1. Go to Cortana on the taskbar. Type gpedit.msc and press Enter.

STEP 2. Follow below path on the left sidebar –
Computer Configuration > Administrative Templates > System > Logon

STEP 3. Look for “Hide Entry Points for Fast User Switching” on the right-hand side. Double click to open its properties.

STEP 4. Here you need to select Enabled and click OK.

Now close the Local Group Policy Editor and restart or log out every other user from your computer. After signing in, go to the start menu and check if the fast user switching options are gone or not.
Conclusion
Windows 10 comes with many features which we are yet to understand and there are some which are of no use to many as it creates problems. Fast User Switching is one such option which many people have no use, and they have to face issues due to it. Disabling or, should I say, hiding the Fast User Switching feature is the only way to deal with it. We hope we were able to help you to disable fast user switching in Windows 10. If you have any questions, please comment below.
