Gmail is undoubtedly one of the most popular e-mail services currently available on any platform. One of Google’s all-time best offerings, Gmail is used every day by hundreds of millions of users throughout the world. All of us possess at least one Gmail account which we use every day for sending and receiving e-mails. But Gmail is capable of much more than just that. Gmail owes its huge popularity to its user-friendly interface and the multitude of functionalities which it offers at the disposal of its users. Mastering these few Gmail tips and tricks can really make you a Gmail Pro.
Even though Gmail is one of the most frequently used application, but still there are several of its features which aren’t that well-known. These somewhat hidden Gmail tips and tricks are in fact so much handy and useful that any Gmail user should be aware of these. These Gmail tips and tricks will make your Gmail experience far more rich and convenient than earlier. And the best part is that these Gmail tips and tricks are very easy to follow. Although there are a huge number of important and useful Gmail tips and tricks, but we’ve shortlisted the best 5 Gmail tips and tricks for you. Just master these Gmail tips and tricks and become a Gmail Power-user.
So here are the best 5 Gmail tips and tricks that every user needs to know:
1. REPENTING OVER AN ALREADY SENT MAIL? JUST UNDO IT.
How often do we find cursing ourselves over an unintended mail sent in haste? It happens to the best of us. Many a time we inadvertently send an e-mail which was not supposed to be sent. At times like this, what won’t we give to have that mail reverted or unsent? What if we told you that it is actually possible.
Well, although it’s practically impossible to undo or revert back an already sent email on Gmail, but Google offers a feature on Gmail which sort of provides the users with a small window in which you can undo a sent mail. Wondering how you can do it? Just follow these easy steps to undo an already sent mail on Gmail:
STEP 1: Open your Gmail account on your browser.
STEP 2: Open Settings by clicking on the settings icon on the upper-right corner of your Gmail Window as shown in the figure.
STEP 3: A drop down menu will appear. Select Settings from within the various options.
STEP 4: Now in the next window, scroll down till you find the Undo Send option.

STEP 5: Now Enable Undo Send by ticking the box beside it. You can select a Send cancellation period from between 5, 10, 20 or 30 seconds as per your wish.
Please note that by enabling this feature, Gmail will provide you with an additional few seconds up to a maximum of 30 seconds in which you can undo a sent mail. But once this period expires, there is no way by which you can unsend or retrieve back an already sent e-mail.
2. SOMEONE SPAMMING YOU ON GMAIL? BLOCK HIM
It’s a well-known fact that Gmail is full of spammers and more than often you’ll find your inbox filled with these fishy e-mails ranging from promotional offers to lottery awards. Many of these senders are mass spammers or companies promoting their goods. Although in most cases these are almost harmless and you can unsubscribe from the most of these. But at times there are those very few irritating spammers who regularly send malware or obscene materials. These senders shouldn’t be ignored. The best thing is to simply block these senders so that they can’t mail you anything in future. Wondering how you can block a particular sender on Gmail?
It’s fairly simple. Just follow these steps to block any irritating sender on Gmail:
STEP 1: Open your Gmail account.
STEP 2: Open any e-mail sent by that particular sender whom you wish to block.
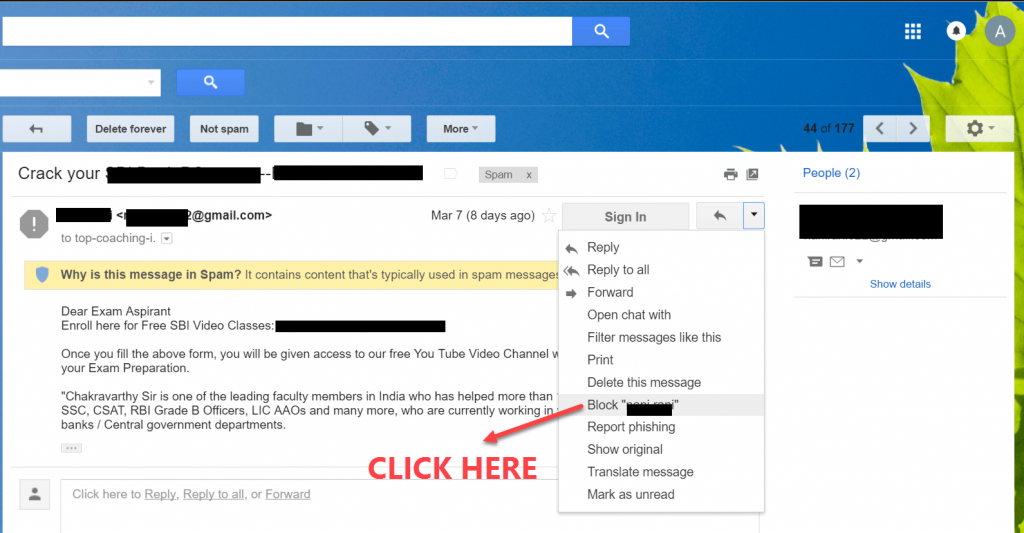
STEP 3: Now click the more button (triangle pointed downward (▾) which is situated just beside the reply button as shown in the figure.

STEP 4: A drop down menu will now appear. Various options will appear. Choose Block “XXX” (containing the name of the sender).
That’s it. That particular sender will be permanently blocked from emailing you and he/she won’t be able to trouble you again ever.
3. WISH TO SEND MAILS AT A PARTICULAR TIME? SCHEDULE THEM
There are times when we have our emails completely written up but we just don’t wish to send them at that particular moment. The one option is to save it as a draft and send it later when the opportune time arrives. However, there is one other way to do it as well. You can schedule your emails to be delivered at future date and time of your wish. For example, you can prefer to have your mail scheduled to be delivered the next day at 10 am to your employer when it is most probable that he would be checking his emails. This way your email won’t be lost under a pile of emails and would be sitting their right at the top.

Please note that Google doesn’t provide any native feature in Gmail through which you can schedule your emails. However, there is a very small Gmail plug-in called Boomerang which can do this very easily for you. You can download this plug-in from here. You can even schedule your read messages to be pushed back at the top at any later time of your choice. This a safe and trusted plug-in, so you need not worry about security. So go ahead and download this amazing plugin to enjoy scheduling emails on Gmail.
4. HAVE MULTIPLE EMAIL ACCOUNTS? YOU CAN USE ALL OF THEM FROM ONE PLACE
Many of us have multiple email accounts. One for professional purposes, another for personal use and maybe yet another for gaming. It often becomes difficult to manage all these different Email accounts. But you need not worry anymore as we’re going to tell you a very simple trick through which you can manage all of your Email accounts be it Gmail accounts or Yahoo accounts or Hotmail accounts from one Gmail Account. Just closely follow these steps:
STEP 1: Open your Gmail account. Now Open Settings by clicking on the settings icon on the upper-right corner of your Gmail Window.
STEP 2: A drop down menu will appear. Select Settings from within the various options.
STEP 4: Now in the next window, open the Accounts and Import Tab as shown in the figure.

STEP 5: Now you’ll have various options at your disposal. You can Check emails from other accounts by adding those email accounts to that particular Gmail account.
STEP 6: You can import all of your emails and contacts from other email accounts by using the Import Mail and Contacts option. You just need to add those email ids and verify them.
STEP 7: You can even send an email through multiple email addresses by adding another email address in Send Mail As option.
5. TIRED OF THE TRACKPAD & MOUSE? TRY THESE AWESOME GMAIL KEYBOARD SHORTCUTS.
Gmail can a lot more fun if you can master a few of the important keyboard shortcuts. Trust us as this will make a huge difference to your Gmail experience. Keyboard shortcuts not only save loads of time but makes your tasks far more convenient and seamlessly easy.
First of all, you’ll have to enable keyboard shortcuts on your Gmail if you haven’t done so yet. To enable keyboard shortcuts on your Gmail, follow these steps:
STEP 1: Open your Gmail Account and head to Settings by clicking on the settings icon on the upper-right corner of your Gmail Window.
STEP 2: A drop down menu will appear. Select Settings from within the various options.
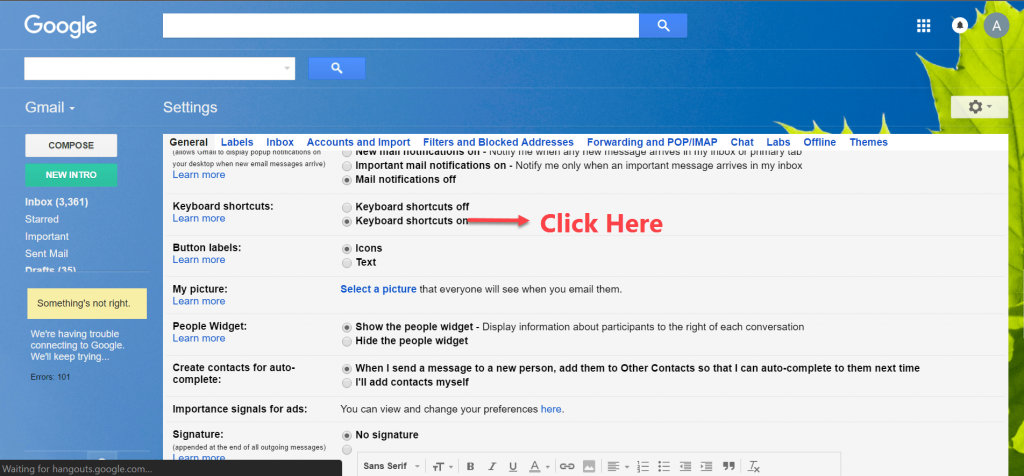
STEP 3: In the General tab, scroll down till you find the Keyboard Shortcuts option. Now turn Keyboard Shortcuts On if it isn’t already so.

Here is the list of few important keyboard shortcuts which every Gmail user needs to know.
- c to compose a new email
- Shift + c to compose a message in a new window
- j to scroll down to older emails
- k to scroll up to newer emails
- e to archive any email
- shift + # to trash any email once you have selected it
- / to type in the search bar
- a to reply all
- r to reply individually
These were the five best Gmail tips and tricks in our opinion which every Gmail user needs to know. There are obviously many other great Gmail tips and tricks which couldn’t make it to this list. If you feel that your favorite Gmail tips and tricks ought to be featured on this list, then let us know by posting your comments below. Till then, stay tuned to Mobipicker for more tips, tricks, and hacks.
